
Admin & teacher setup
Work through the tabs in order. Upload 3 Learners before class lists. Every learner must exist in the system before you link them to a register class or teacher.
Step 1 of 9
Before you begin
Gather these exports
~10 min to collect files
- Whole-school learner list for every grade (SA-SAMS, d6, Edupac, ADAM, or Excel).
- Register / class lists, one per teacher or subject group (Stu No + Key, or Name/Surname).
- Timetable CSV showing who teaches which class and period (optional on day one).
- Educator emails for portal invites.
- NFC wristbands (NTAG213/215). Teachers assign them in the app.
This guide vs CSV Import steps
The tabs below follow setup order. CSV Import uses different step numbers. Use this table:
| This guide | CSV Import screen | What you upload |
|---|---|---|
| Tab 3 Learners | Step 1 | Whole-school roster |
| Tab 4 Register | Step 3 | Class / register lists |
| Tab 5 Timetable | Step 2 | School timetable |
Quick FAQ
- Who uploads class lists?
- The admin can upload for every educator (CSV Import → Step 3). Teachers can also add their own list on the phone (Settings → My Data).
- POPIA & ID numbers
- Do not import SA ID or passport columns. Use learner numbers only. The app blocks ID fields.
- Android or iPhone?
- Both work. Use NTAG213/215 bands. Not MIFARE access-control cards.
- Lost, stolen, or broken band?
- See tab 8 Lost band. Secretary unlinks in Directory → Wristbands. Register teacher assigns the replacement in the app.
- Stuck on something?
- Work through this guide. In the app, tap Try again or Open Setup Guide.
Typical timeline
- Start here10 min
- School & educators25 min
- Learners & class lists45 min
- Timetable & go live20 min
- Teachers & bands30 min
First sign-in · Admin portal
Create your school
~10 min
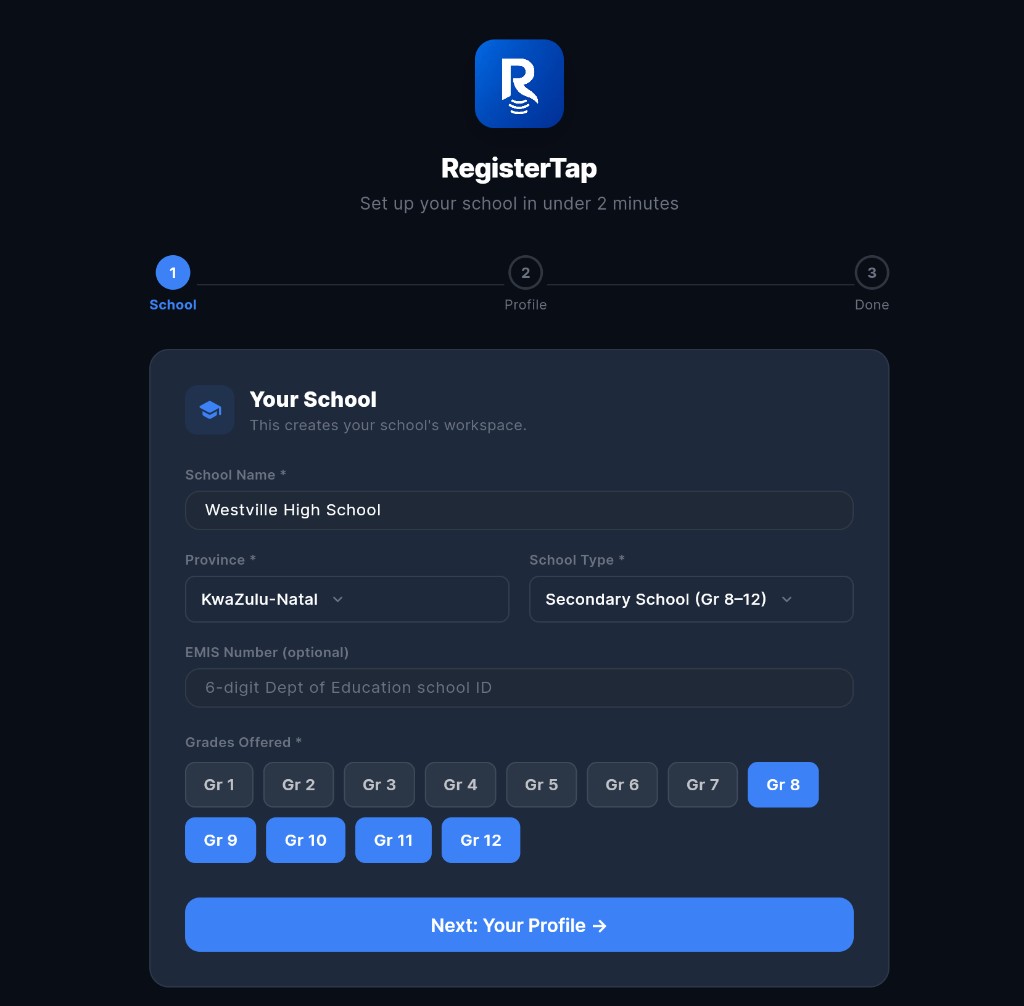
- Sign in at registertap.web.app/app.
- Complete Your School: name, province, type, grades.
- Finish your profile, then copy your School ID for teachers.
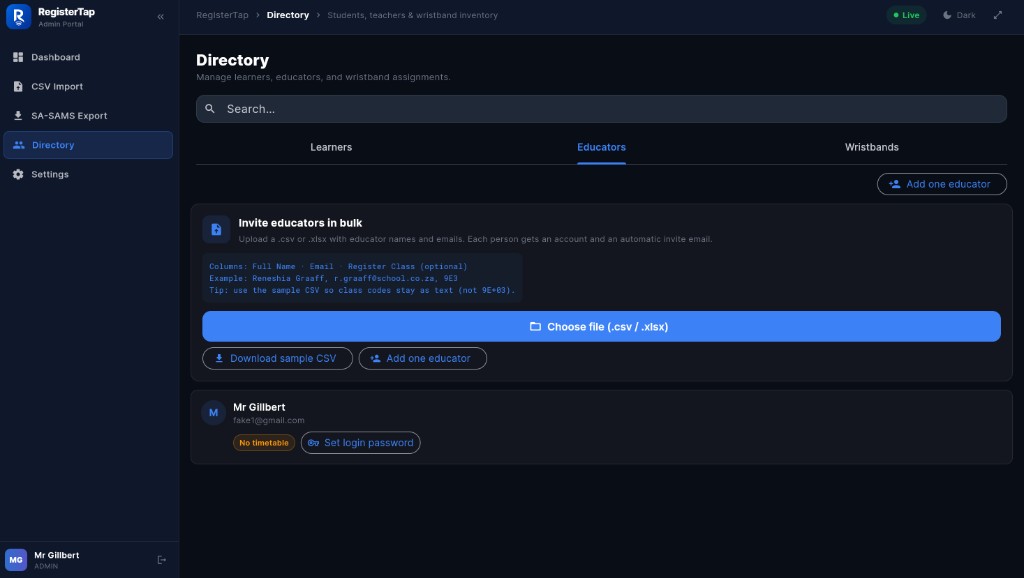
Directory → Educators
Invite educators
~15 min
- Invite in bulk with a CSV (name, email, register class).
- Or Add one educator and share login details.
- Teachers install the mobile app and sign in with the email you invited.
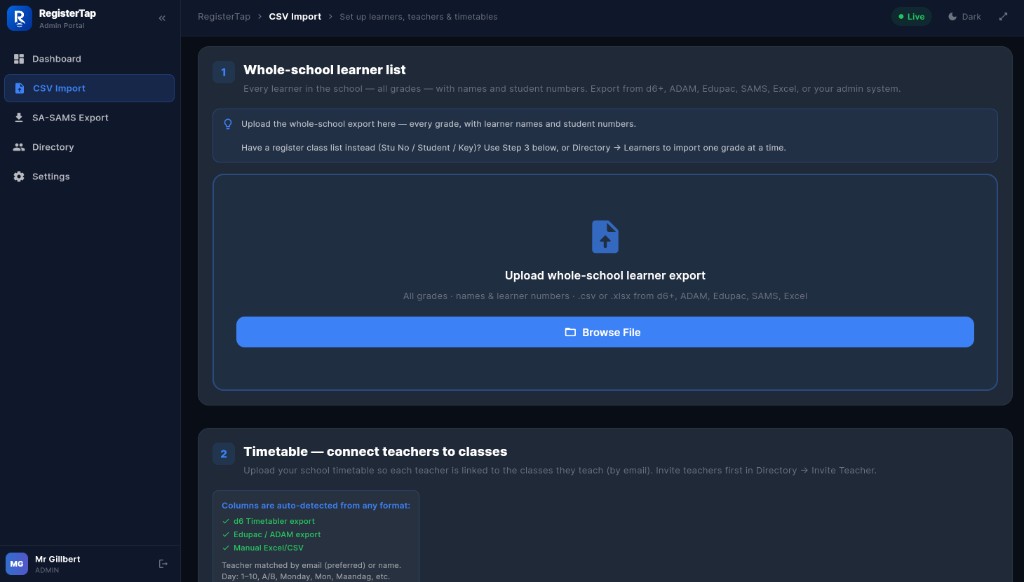
CSV Import → Step 1
Whole-school learner list
~20 min · do this before class lists
- Upload every learner in the school, all grades (
.csvor.xlsx). - Master roster: names and learner numbers. Nothing else works without this.
- Check the preview. ID/passport columns should show as blocked (POPIA).
- Confirm import.
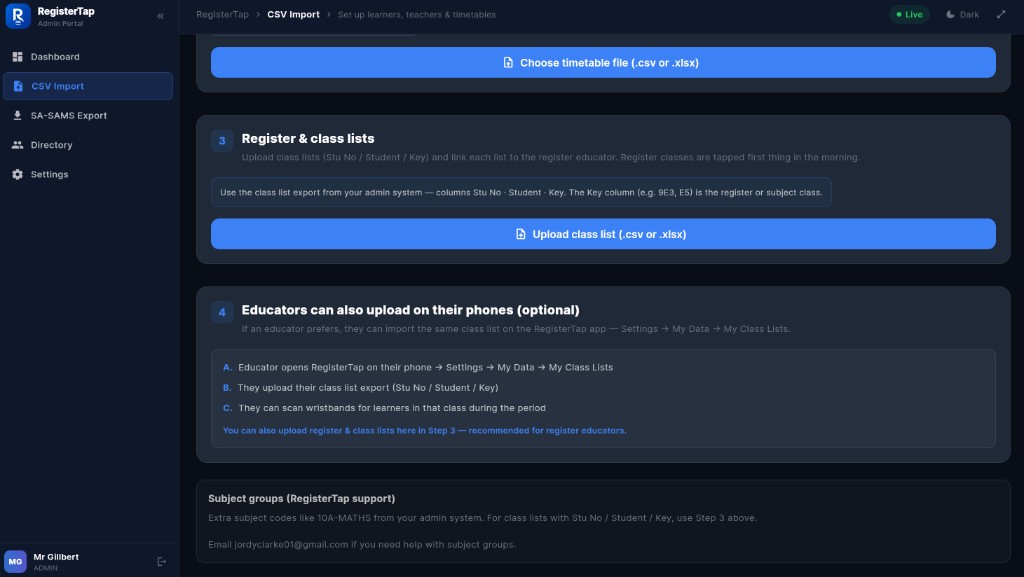
CSV Import → Step 3
Register & class lists
~25 min · one group at a time
- Upload one class list per register or subject group.
- Choose the educator → upload their file → Save & link.
- Admins can upload lists for every teacher (one file at a time, or one file with several Keys).
- New uploads add learners to groups. They do not wipe earlier lists.
- Teachers can also add lists on the phone (Settings → My Data → photo or CSV).
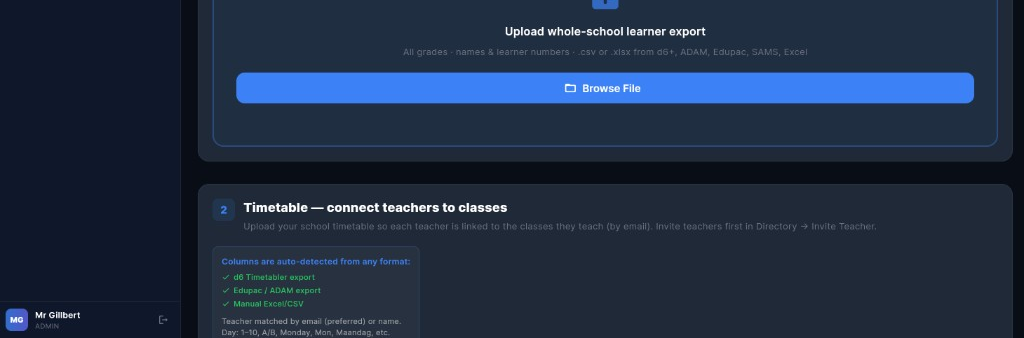
CSV Import → Step 2
Timetable
~15 min
- Upload after educators are invited and class lists exist.
- Validate & Match Teachers → import matched rows.
- A new timetable file replaces the whole timetable. Export a backup first if you are mid-term.
Settings → Timetable & School Day
Go live in admin
~5 min
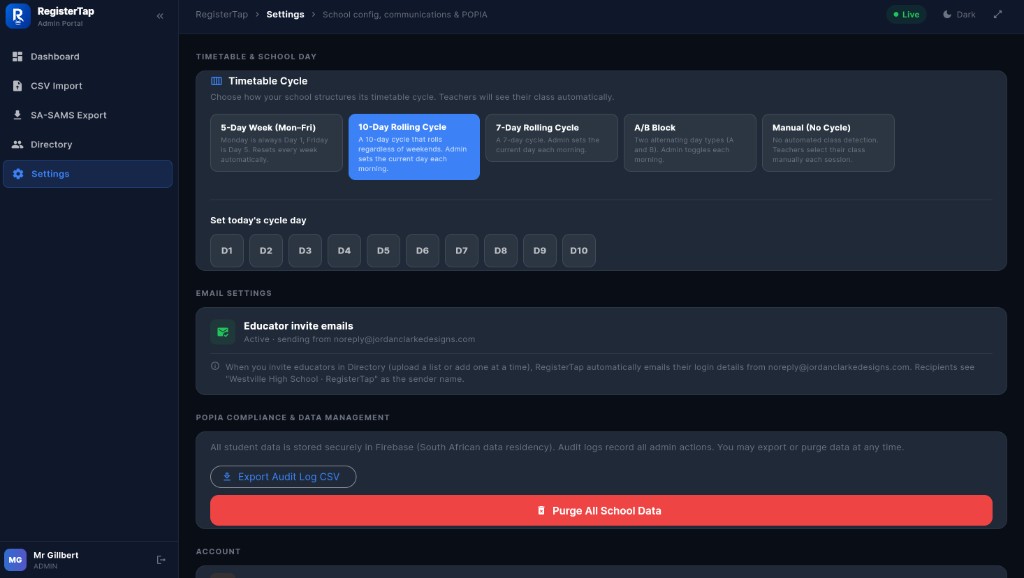
- Set your timetable cycle (5-day, 6-day, etc.) and today’s cycle day if needed.
- Confirm educators appear in Directory with the right register classes.
- Next: tab 7 Teachers for wristbands and scanning.
Teacher mobile app
Wristbands & scanning
~30 min with one class
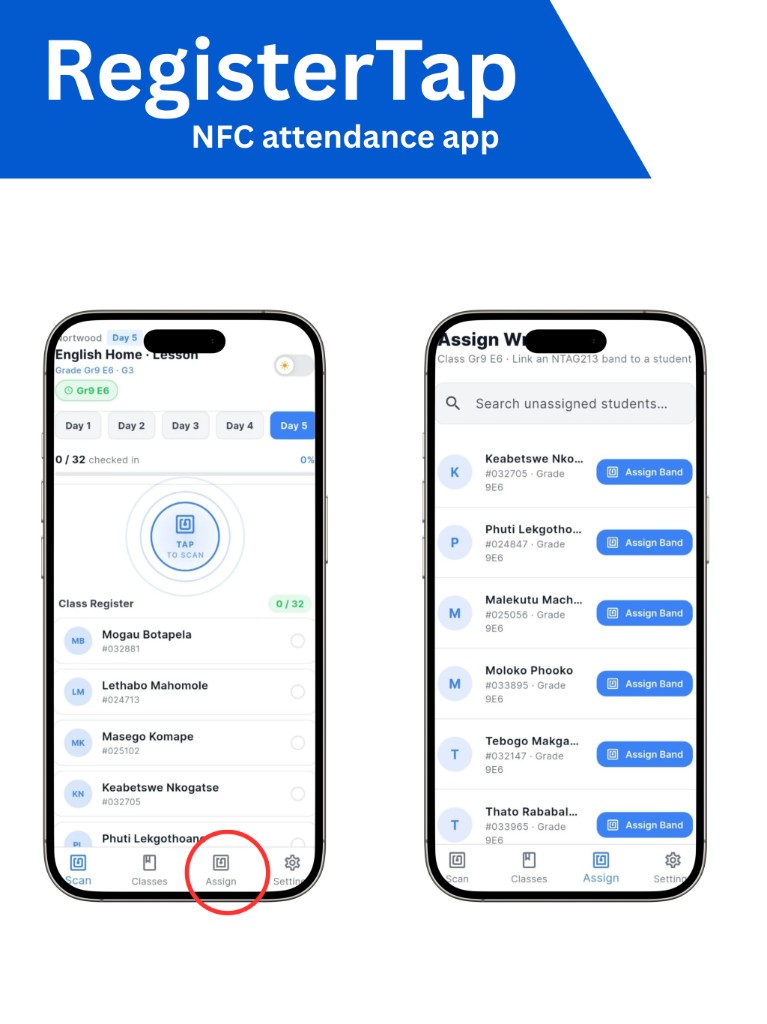
- Teachers install RegisterTap from the App Store or Play Store and sign in.
- Classes: pick today's register class or period.
- Assign: select a learner, tap their NTAG band to link (one band per learner).
- Scan: learners tap at the door. Present shows on the register straight away.
- Works offline. Scans sync when the phone is back online.
- Admin exports morning register via SA-SAMS Export when ready.
- Lost band? See tab 8 Lost band. Unlink in the portal, then Assign a replacement on the app.
Daily office · Directory → Wristbands
Lost wristband protocol
~2 min per learner · keep this at the front desk
Who does what: the secretary unlinks the old band in the admin portal. The register teacher links the replacement on the phone (Assign tab). Always unlink first. A band can only belong to one learner.
- Verify the learner: confirm full name and learner number at the office (ID card or register list).
- Open the admin portal → Directory → Wristbands tab.
- Search by learner name or number. Confirm the row shows Assigned with a wristband UID.
- Click Unlink → confirm. The old band is cleared from that learner and returns to the unassigned pool (even if the physical band is lost).
- Hand the learner a replacement band from your stock (NTAG213/215).
- Send them to their register teacher (or any teacher with the app): Assign → pick the learner → tap the new band. Requires phone internet for this step.
- Learner taps the new band at the door as usual. Past attendance is not deleted. Only the band link changes.
If something goes wrong
| Situation | What to do |
|---|---|
| Teacher sees “This band is already assigned” | The replacement was never unlinked from someone else, or the old band was not unlinked. Secretary: search the band UID in Wristbands (Assigned filter), Unlink the other learner, then retry Assign. |
| Found a band that was reported lost | If you already unlinked the learner, the found band is spare stock. Assign it to whoever needs one. If you forgot to unlink, unlink the original learner first. |
| Band reported stolen | Unlink immediately so it cannot be used to mark attendance. Issue a replacement and re-assign on the app. |
| Learner shows Unassigned but had a band | Someone may have already unlinked. Skip to step 5 (issue replacement + teacher Assign). |
| Teacher phone still shows old band after unlink | Teacher needs internet once so the app syncs. Close and reopen the app if needed. |
Do not use End-of-Year Wristband Reset for one lost band. That clears an entire grade. Use Unlink on the individual learner only.
Office checklist
- 1 Verify name + learner number
- 2 Directory → Wristbands → Unlink
- 3 Issue replacement NTAG band
- 4 Teacher: Assign → tap new band
- 5 Test scan at register
Secretary: steps 1–3. Teacher: steps 4–5.